Friday, December 10, 2010

T-shirt Design

 
something I designed for a T-shirt Idea. I mainly used brushes and added a gradient fill to give it some diversity in color.

Thursday, December 2, 2010

coloring in photoshop


I did almost all of my coloring by using the color replacement tool and experimenting with the color adjustment settings. I also went through and added some textures to some or made my own backgrounds. I used a lot of different brushes that I found on Brusheezy.com and tried to use them to make the pictures look unique.

Wednesday, November 24, 2010

What I'm thankful for


Just a bunch of things that I'm very thankful for :) I played with the hue and saturation when I was done to give it a funky look.

Friday, November 19, 2010

photoshop actions


  I used some actions that I downloaded online to edit these pictures. It was pretty easy and kind of fun to watch the pictures change after just a click of a button.

Wednesday, November 10, 2010

Tilt Shift Photography


I found some photo's on photobucket and I edited them a little by selecting an area with the eliptical marque tool and then inverses the selection to blur out the background. I also added some contrast and saturation to the main focus of the pictures.

Friday, November 5, 2010

Color Replacement 2

Just some more color replacement practice. I changed the color of her shirt and eyes and added a textured background.

Thursday, November 4, 2010

Color Replacement


This week I used some of my drawings to practice the color replacement technique. I added a background as well to both of my pictures just to give them a nice finished look.

Sunday, October 24, 2010

Creepy Halloween Pic


Just a little something for Halloween :) It was relatively easy to make and fun at the same time. I had to put on quite a lot of ghoulish looking make up to get the effect, then for the rest I messed with the lighting and I made good use of the burn tool and the blur tool. For the eyes all I did was go over them with a brush tool and blurred them some more. The only thing I don't like is the text, it's a little hard to see but overall I'm kind of happy with how this turned out.

Wednesday, October 20, 2010

Moozik


 I took another one of my drawings and cleaned it up a bit and added a background.

Friday, October 15, 2010

Flowers

I some-what used a tutorial as a guide-line for this pic, like with the lighting and the way the brushes were used. I didn't want to copy it completely, so i just took bits and pieces of useful information to create my own original photo.  This is the tutorial i used http://photoshoptutorials.ws/photoshop-tutorials/photo-effects/fashion-watercolor-artwork/Page-2.html

Wednesday, October 13, 2010

Pop Art

For this picture I tried to create a "Pop Art" looking effect. I used this tutorial http://photoshoptutorials.ws/photoshop-tutorials/photo-effects/pop-art/Page-3.html as a guide line for making it, but I added a lot of my own touches to it as well.

Sunday, October 10, 2010

Grunge Rock


I took another one of my friends pics and selected the head and shoulders with the magic wand tool, then I made a copy of the selected area and made a dark blue fill layer. I posturized the edges and changed the color tones to blue, then I placed a grungy backgound and downloaded some grunge-sketch brushes. I also added some text at the bottom that I downloaded.

KonKrete

I took one of my friends pictures and selected the area around his head with the magic wand tool, then I made a copy of what was selected and I made a gradiant layer for the background I chose a light blue and a dark blue and used the "Pen sketch" option for the background. On the gradiant layer I used some ink splatter brushes. I posturized the face a bit and I used the noise option to distort it just a little. I then downloaded the text you see at the bottom and placed it in the corner of the pic.


Creepy vampire

 
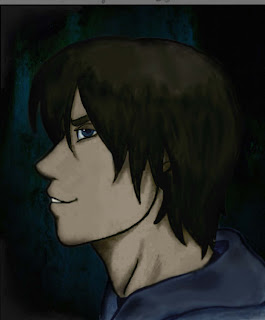
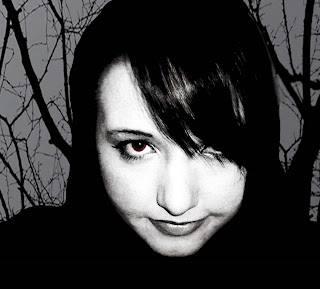
To get into the October/Halloween spirit I made a dark, sinister looking vampire picture. I used the magic wand tool to select the head and shoulders, then I made a copy of what I selected. I inserted a blank layer where I placed the black trees. I made the tree background darker, and I added another layer and made the face black and white, then I selected the eye with the magnetic lasso tool and made it red. I used the burn tool to make the area under the eye-brow darker, and the lips a little darker, then I went into the filters option and clicked "Lighting Options" and changed the shadowing and lighting a little to give it a more eerie effect.

Friday, October 8, 2010

Neon color


 I used one of my old pictures and downloaded some ink splatter brushes and some random other brushes to start. Then, I selected the head and shoulders area of the picture and created a copy of the area selected, then I filled in the original layer with dark grey. In the filled layer I added a bunch of splatter brushes so I wouldn't get too many on the face, then I added some splatter  brushes on the copy layer. I created another layer for the text in the corner, and another to add more brushes. I chose the screen mode for blending the layers. I also selected the eyes and used the color adjustment option to give them that aqua green look.

Wednesday, October 6, 2010

Black and white w/some color


I took one of of my old photos and turned it black and white, then I added a duplicate layer and after setting the opacity to a low level I used the eraser tool on the eyes and the hair.

Friday, October 1, 2010

Anime Girl


I took one of my colored drawings and boosted the lightness and the saturation, then I used the magic wand tool and the magnetic lasso tool to select different parts to bring out the color and make it appear smoother, such as the eyes and face. I used the blur tool and the blending tool to even out the skin tone and to fix the background, too. I also experimented with the color levels on her hat and her lips.

Two faced

 
I opened a new picture in photoshop, then I placed both pictures (which ARE the same person) on the blank picture and selected the background and used the smudge tool to create the weird effect. Then I changed the colors for both sides by experimenting with the color levels and saturation. I made the side of the face that's frowning darker, and the side that's smiling lighter by working on their separate layers.

Thursday, September 30, 2010

Smoke Picture

I took one of my pictures and I selected the background, then I inverted the selection and made a duplicate layer of the selected area. Then I went back to the first layer and filled it in black and desaturated the picture, then I used a filter to find the edges to give it a sketchy look. I raised the contrast then began adding the smoke brush strokes while adding more layers. On the final layer I made a gradient fill and then merged all of the layers together.

Tuesday, September 21, 2010

Panorama


I stitched 4 pictures together using the automate option and went through and changed the contrast of the picture and blurred out some of the damaged areas to make the image look more neat. I had trouble fixing the areas that were faded or damaged, so the quality still doesn't look as good as I'd like it to.

Friday, September 17, 2010

Tropical Mermaid

I took one of my drawings and used the blur tools to smooth out the colors and manipulated the saturation and contrast settings to give the colors a more vibrant effect. I used a number of different selection tools as well.

Wednesday, September 8, 2010

Blue Flowers

I used the magnetic lasso selection tool and the magic wand tool a lot on this picture to change the lighting and colors in different areas. I changed the colors of the flowers to blue and darkened the area around the pole. I also tried to use the rule of thirds in this photo and took it at a different angle rather then the usual straight forward angle.

Old Neighborhood

I took a picture of the neighbor hood that I used to live in in Clearwater. I Mostly changed the colors with this one. I desaturated it and manipulated the colors to give it an old, almost black and white look to it.
I tried to use the rule of thirds method again with this picture, and i cropped the right side a little to get rid of that extra blank space. Then, I changed the color tones and gave it an old, sepia tone color.

Rose

I used the rule of thirds making the rose the center of the photo, and I used the magnetic lasso tool to select the rose to saturate it's color. Then i inverted the selection and brightened the background of the picture.

Friday, August 27, 2010

Project #3

I used the quick selection tool to outline the design pattern, then i went into select and clicked "inverse" and then deleated the background.

Project #2

I used the circle select option on the necklace for the cat, then i saturated the colors  and added feathering around the edges.

Thursday, August 26, 2010

Cat

For one of my projects for the first week i used the magnetic lasso tool to roughly select the outline of the cat and then went into select and used the modify edge option to sharpen the edges. Then I clicked inverse and clicked the gradient tool to get the red and black colors for the background. After that i went to filter and clicked sketch and then i clicked the ink pen option to get the black dashes in the red background.